|
S
|
2 Point Hand over ball
>> X&O Labs Members: Login here to continue reading
Join X&O Labs to Continue Reading…
When you join X&O Labs, you’ll get instant access to the full-length version of this report — including access to everything in The LAB and Film Room. That’s over 4,000 reports and videos.

Read More
By Brett Dudley
Offensive Coordinator/Assistant Head Coach
Antioch (CA) High School
 Editor’s Note: Brett Dudley currently serves as the Offensive Coordinator at Antioch HS in the Bay Area. He has coached football for 6 years and was recently promoted to Varsity Offensive Coordinator/Assistant Head Coach making him the youngest OC in school history. Editor’s Note: Brett Dudley currently serves as the Offensive Coordinator at Antioch HS in the Bay Area. He has coached football for 6 years and was recently promoted to Varsity Offensive Coordinator/Assistant Head Coach making him the youngest OC in school history.
Over the past few years, we have run a variety of screens with much effectiveness. Specifically, we run your classic quick screens bubbles, and jailbreaks in addition to a slow and solid screen (shown later in the insiders version). And while I like each of these for their own reasons, I truly believe that is our offensive line play that has made these screens so effective. Anyone can throw the ball into space and win with a superior athlete, but when the linemen are able to get involved in a consistent and structured way the likelihood of success from year to year is greatly increase.
The key to our success and buy-in by the linemen is the simplicity of our scheme. Here are some of the ways that we develop this concept:
- Every screen is essentially blocked the same way. The only variation is how they “set-up” the play with their initial movements.
- The concept is flexible and works against any front, coverage, and blitz if executed properly.
- The fact that it is a single concept increases the amount of reps that we get on the concept.
- All five line positions have the exact same steps, path, and rules. So if guys get moved around up front due to injury, grade problems, or position change, it doesn’t change their assignment as long as they know the rules.
Base Blocking Rules
Before I getting into the nuance of the “set-ups” for each screen, I wanted to lay the foundation of our concept by looking at the rules that we use in our blocking concept.
Rule #1: All five linemen release on all of our receiver screens. For back screens, like our Slow Screen, we have both tackles high wall defensive ends and only release the interior linemen.
Rule #2: After the set-up for a particular screen, all releasing lineman open up to the playside and run flat down the line of scrimmage for a minimum of 10 yards.
I cannot stress enough how important it is for them to run flat down the line of scrimmage. Experience has taught us that it is so much easier for our linemen to adjust their path by working flat as compared to coming up field then trying to get back flat.
Rule #3: We never pass up color if someone crosses your path you pick them up. This is what allows us to release all 5, and not have to worry about penetration or end getting hands up to stop the screen. If anyone comes up the field then they will run right into one of our OL who is running flat down the LOS and we will rip and run right through him.
It is key that the players understand that they don’t get out of their assignment when the encounter someone running through. Instead, I teach them to work through him like a reach block and continue down field. This has effectively stops the defenders penetration still promotes our player getting out to his original assignment.
Rule #4: As a rules based running team, we felt it only made sense to stick with that concept in the screen game as well. To do that, we have instituted our “Out, Up, In” Rule that works as follows:
- Out: As the player releases down the line of scrimmage, he looks “out” (to the sideline we are running towards) for any unoccupied color. If we see any defenders from the outside/flat area that are unblocked then they continue to collision that players and work to execute a reach block.
- Up: Now if we see all of the “out” defenders accounted for the player transitions into the “Uup” phase of the concept. At this point, the lineman turns his head and shoulder up the field (facing the goal line) and looks for backers or safeties who are coming up the field in pursuit.
- In: Lastly, if there are no unblocked players to the outside or up the field, the player turns his eyes “in” (Opposite sideline of play direction). This allows him to find players who are pursuing from the backside, like scraping backers and trailing ends.
 The advantage of this concept is how it adapts to any defensive call or look. This is, of course, useful since you cannot always predict the defense before the play. Sometimes our receivers won’t know who they are blocking until the ball is snapped, so by teaching my entire the lineman a concept as opposed to a man, they are able to account for any possible unblocked defenders on that side of the field. The advantage of this concept is how it adapts to any defensive call or look. This is, of course, useful since you cannot always predict the defense before the play. Sometimes our receivers won’t know who they are blocking until the ball is snapped, so by teaching my entire the lineman a concept as opposed to a man, they are able to account for any possible unblocked defenders on that side of the field.
Another advantage is that this system can account for players who get caught up on the line of scrimmage. Again, I don’t know which lineman will get a clean easy release on a given snap, that’s why they are all taught to run flat. Sometimes tackle gets caught up with end, keeping him occupied. And we will get guard blocking out, center blocking up, and backside guard and tackle blocking in.
Varied Releases
With those rule in place, we can ensure that all of the screens end the same way with the same techniques. The only difference between the concepts that we run, from a lineman’s perspective, is the release that they take to get into their “Out, Up, In” path. Below I have gone into more detail on how we have adapted these releases to best match our offensive style and concepts.
>> X&O Labs Members: Login here to continue reading
Join X&O Labs to Continue Reading…
When you join X&O Labs, you’ll get instant access to the full-length version of this report — including access to everything in The LAB and Film Room. That’s over 4,000 reports and videos.
Read More
 The first part of my screen series will be describing what each of the screens is. We all have different terminology so I will briefly explain what we use at my school. I didn’t invent this, it is TFS terminology, we might have some slight tweaks but this is how we call our screen game.
We call our screens both by number and by name. In terms of numbers, screens at 40s/50s.
- 40 to the Right
- 50 to the left
The second digit describes which skill player is getting the ball.
- 41/51 = #1 WR
- 42/52 = #2 WR
- 43/53 = #3 WR
- 44/54 = #4 WR
The number by itself indicates who is getting the ball, what direction, and if no tag is used it is the first screen in our screen series which we call QUICK SCREEN.
Quick Screen and Bubbles
A Quick screen is also known as fast screen or hitch screen. #1 WR foot fires 2 steps up field, comes back catching ball behind LOS and reads his blocks.
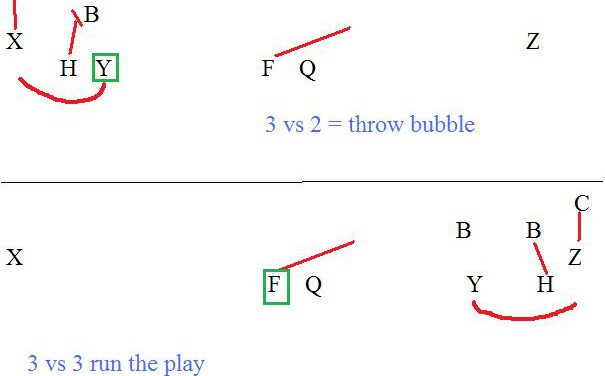
Now we have adapted from traditional TFS for the other WRs on quick screens. I didn’t like #2 and #3 WRs on the quick screens, so we modified it to make them automatic bubbles. So a 42,52,43,53,44,54 are all bubble screens. The called WR runs the bubble, the other WRs stalk their man. We only run bubble when we have a numbers advantage (some teams only have 2 players out there to cover trips) or if we see OLBs who are cheating to stop run and they aren’t honoring our inside WRs.
Solid Screen
Solid is almost the same thing as quick, except with a run fake opposite the direction of the screen first. We can call this play as Solid Rt/Lt. Or by saying 41/51 Solid. Number explains the player and the direction, the “Solid” tag explains that its our solid version of the screen.
Jailbreak
You can probably guess, Jail Rt/Jail Lt. or we can say 41/51 Jail.
Jailbreak is a screen to the outside WR, he will push it up the field further than quick, OL pass sets and releases, QB will pump one way retreat and throw the jail. I have seen some guys refer to this as a tunnel screen. This is my favorite of our screen plays because most teams buy the pass look we show from all 11 guys, blitzers are rushing hard, coverage guys are dropping off getting deep, and then we hit this and get our whole Ol in front leading the way. It was a great play for us this year, our varsity team’s best play this season.
Slow Screen
Slow screen is your typical RB screen, he sets up to block, kinda rolls off and catches the screen. We didn’t run this screen a ton, but more on that later.
So now that I have introduced the basic terminology we use and what each screen is, I will go more in depth into the individual techniques of each screen.
break
Here is how we use the skills talked about in part 1.
Quick Screen:
The #1 WR (widest WR) to the called side foot fires, a lot of exaggeration from arms and feet, really want the CB thinking he has to get deep. He should go about a yard up field, then come back to catch the ball where just behind the LOS. My biggest piece of advice here, is repping the screens live in practice, so he gets used to cutting off his blocks and finding lanes. We allow them to come inside a few steps to let their blockers get in front of them, but it hits best when they get back outside after this. On these WR screens are best long gainers, were when the WR dipped in (behind an OL or WRs block, then got up field or back outside)
Slot WR(s) : The #2 WR has the rule of #1MDM, or most dangerous man to making the play. If he sees a very tight corner then that corner is the most dangerous man and our #2 WR must block him. If the corner is soft and the OLB over him is playing tight then that is the most dangerous man. If both guys are playing soft he will slow play it, going half speed off the LOS looking for who is coming downhill to attack the screen first.
If we are in trips and have a #3 WR he then blocks the second most dangerous defender. We work everyday drills in practice with the WRs recognizing who is picking up who based on their depth.
RB: Original TFS stuff has the RB also getting out on the second defender play side, but ours never really did anything, my Ol were better blockers so I eventually stopped releasing them to block from the backfield. I would either move them out to empty so their path is shorter, or if they are in the backfield they just step up in case somehow someone comes through completely untouched and can possibly fluster the QB.
QB: Grip it and rip it… that’s really it. It is called quick for a reason, he throws it as soon as he gets it. With a kid who has bigger hands I think he can get away with not even getting the laces and just getting it out. I tell my QB to throw the ball to where the WR starts out pre snap. If they throw the ball right there, the WR (after going up and back) should be in the perfect spot to catch the ball.
Bubbles:
Bubbles are fairly simple for the skill guys. We run these to our #2 and #3 WRs, as well as to the Rb out of the backfield.
Called WR runs the bubble route which I teach as follows:
- Align a little deeper than normal for easier window for QB
- Cross over step toward sideline on the snap
- Lose 1 yard on first step
- Run flat down the line after that
- Shoulder North/South
- Head Turned back to Qb
I dont like big looping bubbles, QB has to be extremely accurate and lead the WR just right. We align deeper and lose 1 yard off the snap so we have more depth, makes QBs throw easier. Then we run (kind of a cross over type run) toward sideline, since ou shoulder are square Qb can just throw the ball aiming to throw it in front of the front shoulder, once ball is in the air it is easy for the WR to adjust. Very effective and I don’t recall my team having a single incompletion on bubble all year.
QB: Similar Grip it and rip it idea, key is aiming for bubble man’s front shoulder.
Other WRs: Stalk your man
>> X&O Labs Members: Login here to continue reading
Join X&O Labs to Continue Reading…
When you join X&O Labs, you’ll get instant access to the full-length version of this report — including access to everything in The LAB and Film Room. That’s over 4,000 reports and videos.
Read More
By Jeff Minter
Columnist
X&O Labs
Editors Note: Since 1998 Coach Minter has served as a head coach, coordinated all three phases of the game, and worked with the defensive line, offensive line, linebackers, quarterbacks, and wide receivers. In the past few years, Coach Minter has become one of the most popular and respected coaching bloggers on the web and is excited to be a regular contributor for X&O Labs.
Playoff season has arrived and with it comes more pressure, more responsibilities and in many cases unfamiliar opponents. Each of these factors makes it crucial for coaching staffs fortunate enough to be in the playoffs to have a detailed plan on how they plan on studying their opponent with the added time constraints and pressures.
The key to successfully navigating your post-season film study is simple…WORK SMARTER NOT HARDER!
In reference to coaching and film study this does not mean you can be lazy. You still need to put in the time. However, by prioritizing and organizing how you study film you can reduce the hours you put in allowing you to deal with all of the additional variables that come with post season play.
Delegate to Dominate
The best you can, delegate the film study by position group. Doing this not only empowers more coaches and helps them understand the opponent, but it also allows for more depth of study at each of the given positions.
>> X&O Labs Members: Login here to continue reading
Join X&O Labs to Continue Reading…
When you join X&O Labs, you’ll get instant access to the full-length version of this report — including access to everything in The LAB and Film Room. That’s over 4,000 reports and videos.
Read More
By Zach Cunningham
Secondary Coach
Harrisonville (MO) High School
 Editor’s Note: Coach Cunningham currently serves as the Secondary Coach at Harrisonville High School in Missouri. This is his 4th season at Harrisonville, and prior to that he served in the same capacity at William Chrisman High School in Independece, Missouri. Coach Cunningham played his college ball at William Jewell College in Liberty, MO. Editor’s Note: Coach Cunningham currently serves as the Secondary Coach at Harrisonville High School in Missouri. This is his 4th season at Harrisonville, and prior to that he served in the same capacity at William Chrisman High School in Independece, Missouri. Coach Cunningham played his college ball at William Jewell College in Liberty, MO.
I want to first start by thanking X&O Labs for the opportunity to write about Press Technique. I also want to take a quick moment to thank the coaches I have worked with in the past and especially those in the Kansas City area for their experience and support. Lastly I want to thank all of the players that have played for me for their talent and effort throughout the years.
I have spent the past three seasons as the Secondary Coach at Harrisonville High School, which is located outside of Kansas City, MO. On defense we play an attacking 3-4. We blitz 90% of the time, so we are in man-to-man coverage 90% of the time, mostly with no safety help. Our opponent completion percentage last season (2011) was 28.7% and in 2010 was 32.4%. When we blitz we feel playing man, instead of zone, allows us to dictate what the offense can and cannot do.
There are many benefits of press-man coverage. It disrupts the timing on the routes, and with us blitzing 90% of the time the ball will be out of the quarterback’s hands quickly. We like press-man coverage for three man reasons:
- It allows the defense to put more guys in the box.
- It closes the space between the receiver and defender, which tightens the window for the quarterback to throw into.
- Wide receivers just don’t like being pressed off the line.
Alignment/Stance
Alignment and stance must be addressed first. Everything in the following report will be discussed out of a Cover-0 look. When we are pressing, we will align with an inside shade (defender’s nose to receiver’s inside ear) (Figure 1). I like to use the nose-to-ear as a starting point because it allows my defenders to have a comfortable base with their feet. Some players are naturally wider and longer than others, and some guys are quicker and more explosive with a wider stance. We want to squeeze the line of scrimmage as much as possible, or get as close to being off-sides as we can if the wide receiver is ‘on’ the line. If he is ‘off’, we will align further away from the line of scrimmage and move inside more than usual. I want our defensive backs in a comfortable stance: knees slightly bent, butt behind, eyes up, arms loose (Figure 2). Putting the butt behind the defender allows more room to keep the receiver in front of the defender. It is going to take more steps and work for the wide out to get behind the defender.

Technique:
This is where we will win or lose on the route. I like to teach playing press in two phases:
- 1st phase is the initial contact and the first 3-5 yards of the route.
- 2nd phase is route progression and playing the ball.
1st Phase:
1st phase is usually won or lost on the line of scrimmage. Many coaches teach the slide step and off-hand jam. I prefer more of an attacking method with a punch/counter-punch (p/cp) into the off-hand jam technique. We are already aligned inside the receiver. I teach this to take the inside away and put the defender between the QB and receiver. When we punch/counter-punch (p/cp) our first step is forward with our inside foot. (See figure 3) . This step is not a big one, it’s more like a 6 inch step with the inside foot forward. Simultaneously we will “punch” our inside hand to the inside chest-plate of the receiver. This takes away the inside and forces the wide out to go one direction. The key to this is to not lunge; but stay balanced with a solid base or risk being out of phase within the first step. The second step will match the release of the receiver (outside or inside). The defender’s other hand will “counter-punch” to either the outside chest-plate (outside release) or shoulder (inside release) (Figures 4-5).
>> X&O Labs Members: Login here to continue reading
Join X&O Labs to Continue Reading…
When you join X&O Labs, you’ll get instant access to the full-length version of this report — including access to everything in The LAB and Film Room. That’s over 4,000 reports and videos.
Read More
by Abe Mikell
Assistant Football Coach
Stuarts Draft High School (VA)
A while back, I was talking with a fellow special teams coach about his team and he mentioned that he was having trouble getting buy in from his kids and his fellow coaches. The more I thought about it and the more gamefilm I watched, I realized that this problem is probably much more common than many of us “special teams nuts” might want to admit. With that in mind, I compiled a few tips to help you super charge your special teams by increasing “buy in.”
Tip #1: Involve All Coaches
First and foremost, your head coach needs to take an active role in coaching special teams. He sets the tone for the team so his involvement and energy are a must and show his support for what you are teaching. Our head coach runs most of the scout teams, except for scout kick off, because he has a position to coach on kick off return. Our scout teams work well. It may be that he can motivate them to try hard simply because he is the head coach.
With the head coach on board, you can now delegate position coaching responsibilities to each additional coach. During the preseason, they are responsible for teaching the technique that their position will use to execute their assignment. During preseason camp we work 1-2 phases a day and the coach will get 5-7 minutes with their positions. We will also do circuits to work on specific phases and skills, and the coaches are responsible for stations in the circuit. We have 6 coaches on staff, and 4 are used on each special teams except for kickoff, and then everyone is used except to head coach. He has scout kick off return.
I am the coordinator, which means that I design and teach the schemes to the players and coaches. I am also responsible for creating the scouting report during the season and planning how to use the time for special teams during the practice day. I also adjust the depth charts during the games and for the upcoming week based on input from the “position” coaches.
Tip #2: Manage Your Player/Personnel
Many teams treat special teams far differently than their offense and defense. They post depth for O and D and give detailed scouting reports but then give the bare minimum when it comes to special teams. By using this method, you are creating the perception that special teams are not that important and that they don’t deserve that much time and focus.
We counter this perception intentionally through the way we communicate and manage our players/ST personnel. We usually have a relatively small squad, but one of the most beneficial things that we have done is to create a special teams practice squad. We use this much more in the early part of the year and in preseason. For each team, I have a 2 deep depth chart and a scout team. Ideally, it would work like this: The starters on punt would be your scout team punt, unless they are on the 2 deep for punt return. Your starters on punt return and your scout punt return unless they are on the 2 deep.
The guys that are left over go with the coaches who don’t have a position responsibility. They can work on whatever they want, football skills, whatever. Most of the time these guys will be your offensive line. The only special teams most of them will be on is PAT/FG. By working them during special teams time, we are making sure that players don’t see special teams reps as an opportunity for a long break on the sidelines. This encourages participation across the board.
If your personnel are not getting it done, fire them. I feel like I prep our kids well. This year, I post the weekly scouting report and depth charts for the team to read on a board in the locker room. It is their responsibility to see and read it, especially the depth/personnel. I still go over and communicate any changes, but this way they get it more than once.
By the way most of our subs this late in the season have played on that special teams at some point in the year, they made a shift up or down the depth for one reason or another, usually injury.
Tip #3: Practice Plan for Success
I think you need 15-20 min a day, period. Early in the year, our head coach was forgetting to give any time on Mondays to special teams. It showed in our production. We sucked the 1st couple of games, and he knew it. He gave the time back. Be organized in your time. Try to get as much done in your time as you can, but still be clear in your communication, don’t rush too much. During the season, here is our schedule.
Monday: 10 min punt/10 min punt return. On each, I go over the game plan and adjustments for 3-5 min then 5 min or so of team reps. Half are live and ½ are 15 yd cover or punt blocks. I try to get subs in, but it doesn’t happen much. Punt Block time is diminishing due to a small, but helpful adjustment I made. The defense is our punt return, but we will sub in 3 defensive line to get speed/fresh legs on the field.
Here is how we manage our time to ensure we are prepared for gameday:
Tuesday: 4 reps punt, 8-10 min KO, 7-8 min KO Return. Punt reps and fast and rapid. This week we had to work on getting on the field and executing a punt in under 17 secs including shifts and motion. KO: 3-4 min review and scout then ½ the reps are to15 yard coverage, then ½ are full speed. KO Return: 3-4 min review and scout then ½ the reps are to contact, then ½ are full speed.
>> X&O Labs Members: Login here to continue reading
Join X&O Labs to Continue Reading…
When you join X&O Labs, you’ll get instant access to the full-length version of this report — including access to everything in The LAB and Film Room. That’s over 4,000 reports and videos.
Read More
|


306")

 Here is an everyday drill progression that I have always used with my running backs. Places an emphasis on holding on to the football at all times. Only takes 3-4 mins max.